Cotztomatl Grow Out
My first foray into growing cotztomatl in 2012 started out a little bit bumpy, but I’m pleased that this plant found its footing in my garden and not only grew, but grew really well. There were a few surprises growing this plant, and having spread the seed around a bit in 2013, I’d like to provide those attempting to grow this one themselves with a bit more information than I had to go on.
 It wasn’t just me growing it this year, two friends Meighan and Gayla wanted to grow this one out with me, so we all started the seeds at more or less the same time and started comparing notes.
I had a tough time initially starting this seed. I start my seeds with bottom heat, but no enclosures/domes in order to keep the air circulating. Normally this works just fine for my Solanums, but after weeks I had seen nothing from my Cotztomatl. I resowed. Nothing again. I was starting to think all was lost. Until we compared notes.
Gayla and Meighan started theirs in an actual seed enclosure – and both of them had no trouble with germination. So I resowed again, this time with miniature domes around their individual cells, and sure enough, they germinated no problem.
First lesson learned with Cotztomatl: You need bottom heat and high humidity for proper germination.
The seeds and plants themselves look much like tomatillos, although they have more of a sprawling growth habit. Tomatillos generally grow up from one central stalk, cotztomatl grows out from several at the soil level.
Second lesson learned: These guys need at least three feet of room to grow in every direction. They’re almost unstakeable/uncageable. So give them room to sprawl.
Once they were transplanted they almost needed no care at all. I planted three separate plants, to make sure they had cross-pollination (I wasn’t sure if they were like tomatillos where multiple plants are needed in order to get higher pollination rates), and just let them go.
 The blooms also resemble tomatillos, although they seem to be bigger. They’re a lighter yellow on the outside with a deeper purple/black closer to the centre. They’re gorgeous flowers, and they flower profusely. The plants are gorgeous in the garden just for their flowers alone.
Fruit set was very good (again, I can’t speak for if you only have one plant), it seemed to be very close to 100%. Like tomatillos, without a good amount of heat ripening and setting can be slower. My plants had about 6 hours of direct sun a day, with about 4 additional hours of dappled sun. They did just fine.
I started harvesting the first fruit in August, but the real huge amount came around September/October. Mountains and mountains of the fruit.
So what did it taste like? It’s kind of like a mealier, earthier tomatillo with a slight fruity finish. Sounds strange, right? The fruit is small, less than 1″ in diameter, and a golden orange. It has the husk like many other Physalis species, and that needs to be removed for consumption.
The raw taste was a little… strange. I snacked on a few, it was alright, Gayla hated the flavour.
Third lesson learned: The raw flavour is alright, if a little weird. Cooking with them is awesome.
I liked throwing them into chili and random Mexican-type dishes. They add quite a nice, subtle, earthy flavour to the dish. I imagine they’d be awesome in a salsa, but unfortunately I didn’t make any salsa this year.
I let my plants go on a bit – I live in a place with a very mild winter (snow is scarce at best), so I wanted to see how long these would last for. They even survived a few light frosts without any damage. Unfortunately, a few successive hard frosts is what finally killed them off in January. However, with a cover I believe they would have survived even then.
Fourth lesson learned: It’s a very tender perennial in zone 8. Light frosts won’t kill the plants, but successive hard frosts will.
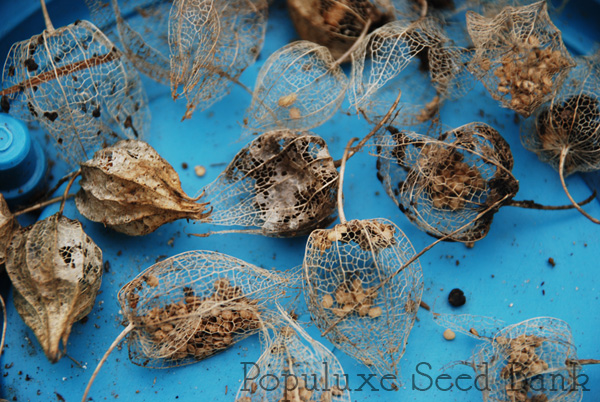
These buggers are not easy to harvest seed from – even more finicky than saving seed from tomatillos. In my ultimate laziness I decided to let them sit outside. Seriously, I just let the fruit sit there, in little tubs outside. Now, I can get away with this because besides maybe from snow a few days a year, all we have is rain for the winter. Letting nature take it’s course to rot away the fruit, leaving just the seeds, was the absolute easiest method to allow me to get these ridiculously tiny seeds out of the dense fruit.
If you’re in an area with a lot of snow, all you’ll have is frozen fruit until the spring thaw. The image you see above is after about three months of fruit sitting outside in the chilly rainy weather here on Vancouver Island.
For colder climates, I’d suggest bringing the ripe fruit under cover (a cold room or storage shed if you have it), and keep these suckers wet. They will rot down, and all you’ll have left is some pretty cool looking skeleton husks, and a bunch of seed kept inside for you to easily slide out and bag up.
This was a great experiment for me in 2012, and I’m glad I had the chance to grow it. It will return to my garden again in future years, and it was a huge bonus that it was such an easy and care-free plant.